> ## Documentation Index
> Fetch the complete documentation index at: https://docs.evocrawl.com/llms.txt
> Use this file to discover all available pages before exploring further.
# Evocrawl MCP 服务器
> 通过模型上下文协议使用 Evocrawl 的 API
一个基于模型上下文协议 (MCP) 的服务器实现,集成了 [Evocrawl](https://github.com/superaihuman/evocrawl),可用于搜索、抓取以及与网页交互。我们的 MCP 服务器开源,代码托管在 [GitHub](https://github.com/superaihuman/evocrawl-mcp-server)。
## 功能
* 进行网页搜索并获取完整页面内容
* 从任意 URL 抓取干净、结构化的数据
* 与页面交互 — 点击、导航和操作
* 借助自主代理进行深度研究
* 浏览器会话管理
* 支持云端与自托管
* 支持 HTTP 流式传输
## 安装
你可以使用我们的托管远程 URL,或在本地运行服务器。请前往 [https://evocrawl.com/app/api-keys](https://www.evocrawl.com/app/api-keys) 获取你的 API 密钥。
### 远程托管 URL
```bash theme={null}
https://mcp.evocrawl.dev/{EVOCRAWL_API_KEY}/v2/mcp
```
### 使用 npx 运行
```bash theme={null}
env EVOCRAWL_API_KEY=fc-YOUR_API_KEY npx -y evocrawl-mcp
```
### 手动安装
```bash theme={null}
npm install -g evocrawl-mcp
```
### 在 Cursor 上运行

#### 手动安装
Configuring Cursor 🖥️
注意:需要 Cursor 版本 0.45.6 及以上
如需获取最新配置说明,请参阅 Cursor 官方关于配置 MCP 服务器的文档:
[Cursor MCP 服务器配置指南](https://docs.cursor.com/context/model-context-protocol#configuring-mcp-servers)
To configure Evocrawl MCP in Cursor **v0.48.6**
1. Open Cursor Settings
2. Go to Features > MCP Servers
3. Click "+ Add new global MCP server"
4. Enter the following code:
```json theme={null}
{
"mcpServers": {
"evocrawl-mcp": {
"command": "npx",
"args": ["-y", "evocrawl-mcp"],
"env": {
"EVOCRAWL_API_KEY": "YOUR-API-KEY"
}
}
}
}
```
To configure Evocrawl MCP in Cursor **v0.45.6**
1. Open Cursor Settings
2. Go to Features > MCP Servers
3. Click "+ Add New MCP Server"
4. Enter the following:
* Name: "evocrawl-mcp" (或你偏好的名称)
* Type: "command"
* Command: `env EVOCRAWL_API_KEY=your-api-key npx -y evocrawl-mcp`
> If you are using Windows and are running into issues, try `cmd /c "set EVOCRAWL_API_KEY=your-api-key && npx -y evocrawl-mcp"`
将 `your-api-key` 替换为你的 EvoCrawl API 密钥。如果你还没有,可以创建账号并从 [https://www.evocrawl.com/app/api-keys](https://www.evocrawl.com/app/api-keys) 获取。
添加后,刷新 MCP 服务器列表以查看新工具。Composer 代理会在合适的情况下自动使用 Evocrawl MCP,但你也可以通过描述你的网页数据需求来显式请求。通过 Command+L (Mac) 打开 Composer,在提交按钮旁选择 "Agent",然后输入你的查询。
### 在 Windsurf 上运行
将以下内容添加到你的 `./codeium/windsurf/model_config.json`:
```json theme={null}
{
"mcpServers": {
"mcp-server-evocrawl": {
"command": "npx",
"args": ["-y", "evocrawl-mcp"],
"env": {
"EVOCRAWL_API_KEY": "你的 API 密钥"
}
}
}
}
```
### 以流式 HTTP 模式运行
要在本地使用流式 HTTP 传输运行服务器,而不是使用默认的 stdio 传输:
```bash theme={null}
env HTTP_STREAMABLE_SERVER=true EVOCRAWL_API_KEY=fc-YOUR_API_KEY npx -y evocrawl-mcp
```
使用以下 URL: [http://localhost:3000/v2/mcp](http://localhost:3000/v2/mcp) 或 [https://mcp.evocrawl.dev/\{EVOCRAWL\_API\_KEY}/v2/mcp](https://mcp.evocrawl.dev/\{EVOCRAWL_API_KEY}/v2/mcp)
### 通过 Smithery 安装(旧版)
要通过 [Smithery](https://smithery.ai/server/@mendableai/mcp-server-evocrawl) 自动为 Claude Desktop 安装 Evocrawl:
```bash theme={null}
npx -y @smithery/cli install @mendableai/mcp-server-evocrawl --client claude
```
### 在 VS Code 中运行
若要一键安装,请点击下方任一安装按钮…
[](https://insiders.vscode.dev/redirect/mcp/install?name=evocrawl\&inputs=%5B%7B%22type%22%3A%22promptString%22%2C%22id%22%3A%22apiKey%22%2C%22description%22%3A%22Evocrawl%20API%20Key%22%2C%22password%22%3Atrue%7D%5D\&config=%7B%22command%22%3A%22npx%22%2C%22args%22%3A%5B%22-y%22%2C%22evocrawl-mcp%22%5D%2C%22env%22%3A%7B%22EVOCRAWL_API_KEY%22%3A%22%24%7Binput%3AapiKey%7D%22%7D%7D) [](https://insiders.vscode.dev/redirect/mcp/install?name=evocrawl\&inputs=%5B%7B%22type%22%3A%22promptString%22%2C%22id%22%3A%22apiKey%22%2C%22description%22%3A%22Evocrawl%20API%20Key%22%2C%22password%22%3Atrue%7D%5D\&config=%7B%22command%22%3A%22npx%22%2C%22args%22%3A%5B%22-y%22%2C%22evocrawl-mcp%22%5D%2C%22env%22%3A%7B%22EVOCRAWL_API_KEY%22%3A%22%24%7Binput%3AapiKey%7D%22%7D%7D\&quality=insiders)
若要手动安装,请将以下 JSON 块添加到 VS Code 的用户设置(JSON)文件中。你可以按下 `Ctrl + Shift + P`,然后输入 `Preferences: Open User Settings (JSON)` 来完成此操作。
```json theme={null}
{
"mcp": {
"inputs": [
{
"type": "promptString",
"id": "apiKey",
"description": "EvoCrawl API 密钥",
"password": true
}
],
"servers": {
"evocrawl": {
"command": "npx",
"args": ["-y", "evocrawl-mcp"],
"env": {
"EVOCRAWL_API_KEY": "${input:apiKey}"
}
}
}
}
}
```
你也可以选择将其添加到工作区中的 `.vscode/mcp.json` 文件中。这样你就可以与他人共享该配置:
```json theme={null}
{
"inputs": [
{
"type": "promptString",
"id": "apiKey",
"description": "EvoCrawl API 密钥",
"password": true
}
],
"servers": {
"evocrawl": {
"command": "npx",
"args": ["-y", "evocrawl-mcp"],
"env": {
"EVOCRAWL_API_KEY": "${input:apiKey}"
}
}
}
}
```
**注意:** 一些用户反馈,在将 MCP server 添加到 VS Code 时会遇到问题,原因是 VS Code 使用了过时的 schema 格式来验证 JSON([microsoft/vscode#155379](https://github.com/microsoft/vscode/issues/155379))。
这会影响多个 MCP 工具,包括 Evocrawl。
**临时解决方案:** 在 VS Code 中禁用 JSON 验证,以便让 MCP server 能够正确加载。
参考:[directus/directus#25906 (comment)](https://github.com/directus/directus/issues/25906#issuecomment-3369169513)。
通过其他扩展调用时,MCP server 仍然可以正常工作,但在直接将其注册到 MCP server 列表时就会出现这个问题。我们计划在 VS Code 更新其 schema 验证机制后补充相应的使用指南。
### 在 Claude Desktop 上运行
将以下内容添加到 Claude 的配置文件中:
```json theme={null}
{
"mcpServers": {
"evocrawl": {
"url": "https://mcp.evocrawl.dev/v2/mcp",
"headers": {
"Authorization": "Bearer YOUR_API_KEY"
}
}
}
}
```
如果你遇到 "Couldn't reach the MCP server" 错误,可能是你的 Claude Desktop 版本不支持流式 HTTP 传输。请改用本地 `npx` 方案 (需要 [Node.js](https://nodejs.org)) :
```json theme={null}
{
"mcpServers": {
"evocrawl": {
"command": "npx",
"args": ["-y", "evocrawl-mcp"],
"env": {
"EVOCRAWL_API_KEY": "YOUR_API_KEY"
}
}
}
}
```
如果你看到 `spawn npx ENOENT` 错误,说明 Node.js 未安装或未加入系统 PATH。请从 [nodejs.org](https://nodejs.org) 安装 Node.js (LTS 版本) ,然后彻底重启 Claude Desktop。在 Windows 上,你也可以在命令提示符中运行 `where npx`,并将完整路径 (例如 `C:\\Program Files\\nodejs\\npx.cmd`) 作为 `command` 的值。
### 在 Claude Code 上运行
使用 Claude Code CLI 添加 Evocrawl MCP 服务器。你可以使用远程托管 URL,或在本地运行:
```bash theme={null}
# 远程托管 URL(推荐)
claude mcp add evocrawl --url https://mcp.evocrawl.dev/your-api-key/v2/mcp
# 或通过 npx 在本地运行
claude mcp add evocrawl -e EVOCRAWL_API_KEY=your-api-key -- npx -y evocrawl-mcp
```
### 在 Google Antigravity 上运行
Google Antigravity 允许你直接通过其 Agent 界面配置 MCP 服务器。
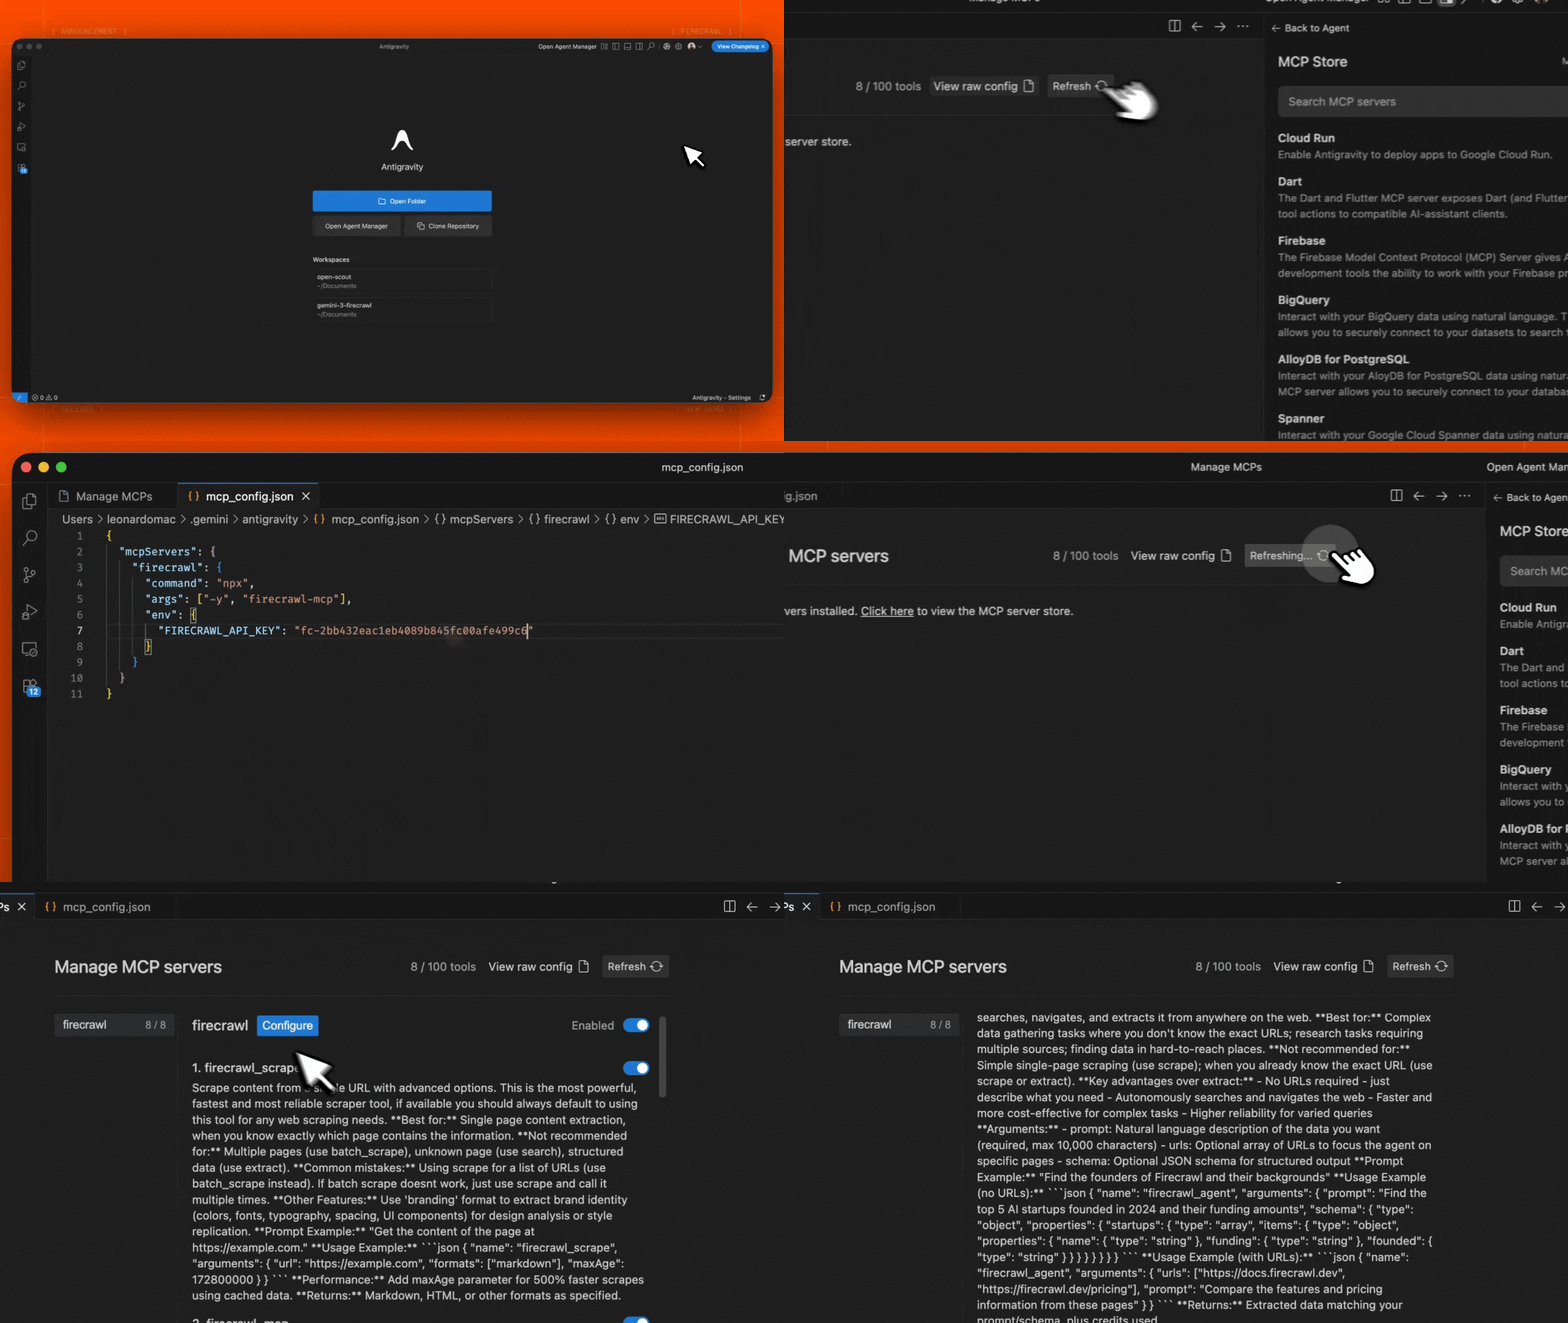 1. 在 Editor 或 Agent Manager 视图中打开 Agent 侧边栏
2. 点击 "..."(More Actions 更多操作)菜单并选择 **MCP Servers**
3. 选择 **View raw config** 以打开本地的 `mcp_config.json` 文件
4. 添加以下配置:
```json theme={null}
{
"mcpServers": {
"evocrawl": {
"command": "npx",
"args": ["-y", "evocrawl-mcp"],
"env": {
"EVOCRAWL_API_KEY": "YOUR_EVOCRAWL_API_KEY"
}
}
}
}
```
5. 保存文件,然后在 Antigravity MCP 界面中点击 **Refresh** 以查看新工具。
将 `YOUR_EVOCRAWL_API_KEY` 替换为你在 [https://evocrawl.com/app/api-keys](https://www.evocrawl.com/app/api-keys) 获取的 API key。
1. 在 Editor 或 Agent Manager 视图中打开 Agent 侧边栏
2. 点击 "..."(More Actions 更多操作)菜单并选择 **MCP Servers**
3. 选择 **View raw config** 以打开本地的 `mcp_config.json` 文件
4. 添加以下配置:
```json theme={null}
{
"mcpServers": {
"evocrawl": {
"command": "npx",
"args": ["-y", "evocrawl-mcp"],
"env": {
"EVOCRAWL_API_KEY": "YOUR_EVOCRAWL_API_KEY"
}
}
}
}
```
5. 保存文件,然后在 Antigravity MCP 界面中点击 **Refresh** 以查看新工具。
将 `YOUR_EVOCRAWL_API_KEY` 替换为你在 [https://evocrawl.com/app/api-keys](https://www.evocrawl.com/app/api-keys) 获取的 API key。
### 在 n8n 中运行
要在 n8n 中连接 Evocrawl MCP 服务器:
1. 在 [https://evocrawl.com/app/api-keys](https://www.evocrawl.com/app/api-keys) 获取你的 EvoCrawl API 密钥
2. 在你的 n8n 工作流中,添加一个 **AI Agent** 节点
3. 在 AI Agent 配置中,添加一个新的 **Tool**
4. 将工具类型选择为 **MCP Client Tool**
5. 输入 MCP 服务器 Endpoint(将 `{YOUR_EVOCRAWL_API_KEY}` 替换为你的实际 API 密钥):
```
https://mcp.evocrawl.dev/{YOUR_EVOCRAWL_API_KEY}/v2/mcp
```
6. 将 **Server Transport** 设置为 **HTTP Streamable**
7. 将 **Authentication** 设置为 **None**
8. 在 **Tools to include** 中,你可以选择 **All**、**Selected** 或 **All Except** —— 这会提供对 Evocrawl 工具(scrape、crawl、map、search、extract 等)的访问
对于自托管部署,使用 npx 运行 MCP 服务器,并启用 HTTP 传输模式:
```bash theme={null}
env HTTP_STREAMABLE_SERVER=true \
EVOCRAWL_API_KEY=fc-YOUR_API_KEY \
EVOCRAWL_API_URL=YOUR_EVOCRAWL_INSTANCE \
npx -y evocrawl-mcp
```
这会在 `http://localhost:3000/v2/mcp` 上启动服务器,你可以在 n8n 工作流中将其用作端点(Endpoint)。需要设置环境变量 `HTTP_STREAMABLE_SERVER=true`,因为 n8n 需要使用 HTTP 传输。
## 配置
### 环境变量
#### 云端 API 必需
* `EVOCRAWL_API_KEY`:你的 EvoCrawl API 密钥
* 使用云端 API(默认)时必需
* 在使用并配置了 `EVOCRAWL_API_URL` 的自托管实例时可选
* `EVOCRAWL_API_URL`(可选):自托管实例的自定义 API 端点
* 示例:`https://evocrawl.your-domain.com`
* 如未提供,将使用云端 API(需要提供 API 密钥)
#### 可选配置
##### 重试配置
* `EVOCRAWL_RETRY_MAX_ATTEMPTS`: 最大重试次数(默认:3)
* `EVOCRAWL_RETRY_INITIAL_DELAY`: 首次重试前的初始延迟(单位:毫秒,默认:1000)
* `EVOCRAWL_RETRY_MAX_DELAY`: 各次重试之间的最大延迟(单位:毫秒,默认:10000)
* `EVOCRAWL_RETRY_BACKOFF_FACTOR`: 指数退避系数(默认:2)
##### 额度使用监控
* `EVOCRAWL_CREDIT_WARNING_THRESHOLD`: 额度使用警告阈值(默认值:1000)
* `EVOCRAWL_CREDIT_CRITICAL_THRESHOLD`: 额度使用临界阈值(默认值:100)
### 配置示例
用于云端 API 的自定义重试与额度监控:
```bash theme={null}
# 云端 API 必需
export EVOCRAWL_API_KEY=your-api-key
# 可选的重试配置
export EVOCRAWL_RETRY_MAX_ATTEMPTS=5 # 提高最大重试次数
export EVOCRAWL_RETRY_INITIAL_DELAY=2000 # 初始延迟 2 秒
export EVOCRAWL_RETRY_MAX_DELAY=30000 # 最长延迟 30 秒
export EVOCRAWL_RETRY_BACKOFF_FACTOR=3 # 更激进的退避策略
# 可选的额度监控
export EVOCRAWL_CREDIT_WARNING_THRESHOLD=2000 # 配额 2000 时预警
export EVOCRAWL_CREDIT_CRITICAL_THRESHOLD=500 # 配额 500 时严重警报
```
自托管实例:
```bash theme={null}
# 自托管必需
export EVOCRAWL_API_URL=https://evocrawl.your-domain.com
# 自托管的可选身份验证
export EVOCRAWL_API_KEY=your-api-key # 如果你的实例需要身份验证
# 自定义重试配置
export EVOCRAWL_RETRY_MAX_ATTEMPTS=10
export EVOCRAWL_RETRY_INITIAL_DELAY=500 # 以更短的间隔开始重试
```
### 在 Claude Desktop 中进行自定义配置
将以下内容添加到你的 `claude_desktop_config.json` 中:
```json theme={null}
{
"mcpServers": {
"mcp-server-evocrawl": {
"command": "npx",
"args": ["-y", "evocrawl-mcp"],
"env": {
"EVOCRAWL_API_KEY": "YOUR_API_KEY_HERE",
"EVOCRAWL_RETRY_MAX_ATTEMPTS": "5",
"EVOCRAWL_RETRY_INITIAL_DELAY": "2000",
"EVOCRAWL_RETRY_MAX_DELAY": "30000",
"EVOCRAWL_RETRY_BACKOFF_FACTOR": "3",
"EVOCRAWL_CREDIT_WARNING_THRESHOLD": "2000",
"EVOCRAWL_CREDIT_CRITICAL_THRESHOLD": "500"
}
}
}
}
```
### 系统配置
服务器包含多个可配置参数,可通过环境变量进行设置。若未配置,将使用以下默认值:
```typescript theme={null}
const CONFIG = {
retry: {
maxAttempts: 3, // Number of retry attempts for rate-limited requests
initialDelay: 1000, // Initial delay before first retry (in milliseconds)
maxDelay: 10000, // Maximum delay between retries (in milliseconds)
backoffFactor: 2, // Multiplier for exponential backoff
},
credit: {
warningThreshold: 1000, // Warn when credit usage reaches this level
criticalThreshold: 100, // 额度使用达到此级别时发出严重警报
},
};
```
这些配置用于控制:
1. **重试行为**
* 在因速率限制导致请求失败时自动重试
* 使用指数退避以避免对 API 施加过大压力
* 示例:在默认设置下,重试会按如下时间进行:
* 第 1 次重试:延迟 1 秒
* 第 2 次重试:延迟 2 秒
* 第 3 次重试:延迟 4 秒(但不会超过 maxDelay)
2. **额度使用监控**
* 跟踪云端 API 使用时的额度消耗
* 在达到指定阈值时发出警告
* 帮助避免意外的服务中断
* 示例:在默认设置下:
* 当剩余 1000 点额度时发出警告
* 当剩余 100 点额度时发出关键告警
### 限流与批处理
服务器利用 Evocrawl 内置的限流和批处理能力:
* 通过指数退避策略自动处理限流
* 面向批量操作的高效并行处理
* 智能请求排队与限流
* 对瞬时错误自动重试
## 可用的工具
### 1. Scrape 工具(`evocrawl_scrape`)
使用高级选项从单个 URL 提取内容。
```json theme={null}
{
"name": "evocrawl_scrape",
"arguments": {
"url": "https://example.com",
"formats": ["markdown"],
"onlyMainContent": true,
"waitFor": 1000,
"mobile": false,
"includeTags": ["article", "main"],
"excludeTags": ["nav", "footer"],
"skipTlsVerification": false
}
}
```
### 2. Map Tool (`evocrawl_map`)
对网站进行映射,以发现站点上所有已收录的 URL。
```json theme={null}
{
"name": "evocrawl_map",
"arguments": {
"url": "https://example.com",
"search": "blog",
"sitemap": "include",
"includeSubdomains": false,
"limit": 100,
"ignoreQueryParameters": true
}
}
```
#### Map 工具选项:
* `url`: 要映射的网站基础 URL
* `search`: 可选搜索词,用于过滤 URL
* `sitemap`: 控制 sitemap 的使用方式 —— "include"、"skip" 或 "only"
* `includeSubdomains`: 映射时是否包含子域名
* `limit`: 要返回的 URL 最大数量
* `ignoreQueryParameters`: 映射时是否忽略查询参数
**最佳用途:** 在决定抓取哪些页面之前先发现网站上的 URL;查找网站的特定区域。
**返回值:** 在网站上发现的 URL 数组。
### 3. 搜索工具(`evocrawl_search`)
在网络上进行搜索,并可选地从搜索结果中提取内容。
```json theme={null}
{
"name": "evocrawl_search",
"arguments": {
"query": "您的搜索查询",
"limit": 5,
"location": "United States",
"tbs": "qdr:m",
"scrapeOptions": {
"formats": ["markdown"],
"onlyMainContent": true
}
}
}
```
#### 搜索工具选项:
* `query`:搜索查询字符串(必需)
* `limit`:返回结果的最大数量
* `location`:搜索结果的地理位置
* `tbs`:按时间过滤的搜索参数(例如,`qdr:d` 表示过去一天,`qdr:w` 表示过去一周,`qdr:m` 表示过去一个月)
* `filter`:额外的搜索过滤条件
* `sources`:要搜索的来源类型数组(`web`、`images`、`news`)
* `scrapeOptions`:抓取搜索结果页面时的配置选项
* `enterprise`:企业相关选项数组(`default`、`anon`、`zdr`)
### 4. Crawl Tool (`evocrawl_crawl`)
使用高级选项启动一次异步爬取。
```json theme={null}
{
"name": "evocrawl_crawl",
"arguments": {
"url": "https://example.com",
"maxDiscoveryDepth": 2,
"limit": 100,
"allowExternalLinks": false,
"deduplicateSimilarURLs": true
}
}
```
### 5. 检查爬取状态 (`evocrawl_check_crawl_status`)
检查爬取任务的状态。
```json theme={null}
{
"name": "evocrawl_check_crawl_status",
"arguments": {
"id": "550e8400-e29b-41d4-a716-446655440000"
}
}
```
**返回:** 抓取任务的状态和进度,如有则包含结果。
利用 LLM 能力从网页中提取结构化数据,同时支持云端 AI 和自托管 LLM 的提取。
```json theme={null}
{
"name": "evocrawl_extract",
"arguments": {
"urls": ["https://example.com/page1", "https://example.com/page2"],
"prompt": "提取产品信息,包括名称、价格和描述",
"schema": {
"type": "object",
"properties": {
"name": { "type": "string" },
"price": { "type": "number" },
"description": { "type": "string" }
},
"required": ["name", "price"]
},
"allowExternalLinks": false,
"enableWebSearch": false,
"includeSubdomains": false
}
}
```
响应示例:
```json theme={null}
{
"content": [
{
"type": "text",
"text": {
"name": "Example Product",
"price": 99.99,
"description": "This is an example product description"
}
}
],
"isError": false
}
```
* `urls`: 要从中提取信息的 URL 数组
* `prompt`: 用于 LLM 提取的自定义提示词
* `schema`: 用于结构化数据提取的 JSON schema
* `allowExternalLinks`: 是否允许从外部链接提取
* `enableWebSearch`: 是否启用 Web 搜索以获取额外上下文
* `includeSubdomains`: 提取时是否包含子域名
在使用自托管实例时,提取将使用你配置的 LLM。对于云端 API,则会使用 Evocrawl 托管的 LLM 服务。
### 7. Agent Tool (`evocrawl_agent`)
自主 Web 研究智能体,可以独立浏览互联网、搜索信息、在页面之间导航,并根据你的查询提取结构化数据。该工具以异步方式运行 —— 会立即返回一个 job ID,你需要轮询 `evocrawl_agent_status` 以检查任务何时完成并获取结果。
```json theme={null}
{
"name": "evocrawl_agent",
"arguments": {
"prompt": "Find the top 5 AI startups founded in 2024 and their funding amounts",
"schema": {
"type": "object",
"properties": {
"startups": {
"type": "array",
"items": {
"type": "object",
"properties": {
"name": { "type": "string" },
"funding": { "type": "string" },
"founded": { "type": "string" }
}
}
}
}
}
}
}
```
你也可以提供特定的 URL,让 agent 重点处理这些 URL:
```json theme={null}
{
"name": "evocrawl_agent",
"arguments": {
"urls": ["https://docs.evocrawl.com", "https://evocrawl.com/pricing"],
"prompt": "Compare the features and pricing information from these pages"
}
}
```
#### Agent 工具选项:
* `prompt`: 对所需数据的自然语言描述(必填,最多 10,000 个字符)
* `urls`: 可选的 URL 数组,用于让 agent 聚焦在特定页面
* `schema`: 可选的 JSON schema,用于结构化输出
**最适合:** 在你不知道具体 URL 的复杂研究任务;多来源数据收集;查找分散在整个网络上的信息;从严重依赖 JavaScript、常规抓取失效的 SPA 中提取数据。
**返回:** 用于检查任务状态的 Job ID。使用 `evocrawl_agent_status` 轮询获取结果。
### 8. 检查 Agent 状态 (`evocrawl_agent_status`)
检查 Agent 作业的状态,并在完成后获取结果。每隔 15–30 秒轮询一次,在持续轮询至少 2–3 分钟后再认为请求失败。
```json theme={null}
{
"name": "evocrawl_agent_status",
"arguments": {
"id": "550e8400-e29b-41d4-a716-446655440000"
}
}
```
#### Agent 状态选项:
* `id`: `evocrawl_agent` 返回的 Agent 任务 ID(必需)
**可能的状态:**
* `processing`: Agent 仍在执行任务 —— 继续轮询
* `completed`: 任务已完成 —— 响应中包含提取的数据
* `failed`: 发生错误
**返回:** Agent 任务的状态、进度,以及(如果已完成)结果。
### 9. 创建浏览器会话 (`evocrawl_browser_create`)
创建一个通过 CDP(Chrome DevTools Protocol)执行代码的持久浏览器会话。
```json theme={null}
{
"name": "evocrawl_browser_create",
"arguments": {
"ttl": 120,
"activityTtl": 60
}
}
```
#### 浏览器创建选项:
* `ttl`: 会话的总生命周期(以秒为单位,30-3600,可选)
* `activityTtl`: 空闲超时时间(以秒为单位,10-3600,可选)
**最适合用于:** 运行与实时浏览器页面交互的代码(Python/JS)、多步浏览器自动化、在多次工具调用之间仍能保留配置档案的会话。
**返回:** 会话 ID、CDP URL 和实时视图 URL。
### 10. 在浏览器中执行代码 (`evocrawl_browser_execute`)
在一个活动的浏览器会话中执行代码。支持 agent-browser 命令(Bash)、Python 或 JavaScript。
```json theme={null}
{
"name": "evocrawl_browser_execute",
"arguments": {
"sessionId": "session-id-here",
"code": "agent-browser open https://example.com",
"language": "bash"
}
}
```
基于 Playwright 的 Python 示例:
```json theme={null}
{
"name": "evocrawl_browser_execute",
"arguments": {
"sessionId": "session-id-here",
"code": "await page.goto('https://example.com')\ntitle = await page.title()\nprint(title)",
"language": "python"
}
}
```
#### 浏览器执行选项:
* `sessionId`: 浏览器会话 ID(必填)
* `code`: 要执行的代码(必填)
* `language`: `bash`、`python` 或 `node`(可选,默认为 `bash`)
**常用 agent-browser 命令(bash):**
* `agent-browser open ` -- 跳转到指定 URL
* `agent-browser snapshot` -- 获取带有可点击引用的可访问性树
* `agent-browser click @e5` -- 根据快照中的引用点击元素
* `agent-browser type @e3 "text"` -- 向元素中输入文本
* `agent-browser screenshot [path]` -- 进行截图
* `agent-browser scroll down` -- 向下滚动页面
* `agent-browser wait 2000` -- 等待 2 秒
**返回:** 执行结果,包括 stdout、stderr 和退出码。
### 11. 删除浏览器会话 (`evocrawl_browser_delete`)
终止一个浏览器会话。
```json theme={null}
{
"name": "evocrawl_browser_delete",
"arguments": {
"sessionId": "session-id-here"
}
}
```
#### 浏览器删除选项:
* `sessionId`: 要删除的浏览器会话 ID(必填)
**返回:** 成功确认信息。
### 12. 列出浏览器会话 (`evocrawl_browser_list`)
列出浏览器会话,可按状态筛选。
```json theme={null}
{
"name": "evocrawl_browser_list",
"arguments": {
"status": "active"
}
}
```
#### 浏览器列表选项:
* `status`: 按会话状态进行过滤 —— `active` 或 `destroyed`(可选)
**返回:** 浏览器会话数组。
### 13. 与已抓取的页面交互 (`evocrawl_interact`)
在实时浏览器会话中与之前抓取的页面进行交互。请先使用 `evocrawl_scrape` 抓取页面,然后使用返回的 `scrapeId` (来自抓取响应的元数据) 点击按钮、填写表单、提取动态内容,或继续深入导航。响应中包含 `liveViewUrl` 和 `interactiveLiveViewUrl`,你可以在浏览器中打开它们,以实时查看或控制该会话。
```json theme={null}
{
"name": "evocrawl_interact",
"arguments": {
"scrapeId": "scrape-id-from-previous-scrape",
"prompt": "Click the Sign In button"
}
}
```
#### 交互工具选项:
* `scrapeId`:先前 `evocrawl_scrape` 调用返回的抓取任务 ID (必填)
* `prompt`:用于描述要执行操作的自然语言指令 (提供 `prompt` 或 `code`)
* `code`:在浏览器会话中执行的代码 (提供 `code` 或 `prompt`)
* `language`:`bash`、`python` 或 `node` (可选,默认值为 `node`,仅在使用 `code` 时生效)
* `timeout`:执行超时时间 (秒) ,1–300 (可选,默认值为 30)
**最适合:** 在单个页面上执行多步骤工作流——例如站内搜索、逐个点击结果、填写表单,以及提取需要交互的数据。
**返回:** 交互结果,包括 `liveViewUrl` 和 `interactiveLiveViewUrl`。
### 14. 停止交互会话 (`evocrawl_interact_stop`)
停止已抓取页面的交互会话。完成交互后,请调用此操作以释放资源。
```json theme={null}
{
"name": "evocrawl_interact_stop",
"arguments": {
"scrapeId": "scrape-id-from-previous-scrape"
}
}
```
#### 交互停止选项:
* `scrapeId`:要停止的会话的 scrape ID (必填)
**返回:** 确认会话已停止。
## 日志系统
服务器提供全面的日志记录:
* 操作状态与进度
* 性能指标
* 额度使用监控
* 速率限制跟踪
* 错误情况
示例日志消息:
```
[INFO] Evocrawl MCP Server initialized successfully
[INFO] 开始抓取 URL:https://example.com
[INFO] Starting crawl for URL: https://example.com
[WARNING] Credit usage has reached warning threshold
[ERROR] Rate limit exceeded, retrying in 2s...
```
## 错误处理
服务器提供完善的错误处理能力:
* 对临时性错误进行自动重试
* 带退避策略的限流处理
* 详细的错误信息
* 额度使用预警
* 网络健壮性
示例错误响应:
```json theme={null}
{
"content": [
{
"type": "text",
"text": "错误:超出速率限制。2 秒后重试..."
}
],
"isError": true
}
```
## 开发
```bash theme={null}
# 安装依赖项
npm install
# 构建项目
npm run build
# 运行测试
npm test
```
### 参与贡献
1. Fork 本仓库
2. 创建你的功能分支
3. 运行测试:`npm test`
4. 提交一个 Pull Request
### 致谢贡献者
感谢 [@vrknetha](https://github.com/vrknetha)、[@cawstudios](https://caw.tech) 完成初始实现!
感谢 MCP.so 和 Klavis AI 提供托管支持,亦感谢 [@gstarwd](https://github.com/gstarwd)、[@xiangkaiz](https://github.com/xiangkaiz) 与 [@zihaolin96](https://github.com/zihaolin96) 集成我们的服务器。
## 许可
MIT 许可 — 详情请查看 LICENSE 文件